Description
The following example demonstrates how to create a project from scratch, using a dockerized Airflow project, an S3
Bucket and a MongoDB Connection.
In this example we will demonstrate how to use airgoodies to quickly set up a workflow that will load a .csv file
from our S3 Bucket, filters its data to extract what we need and afterward save the result into a MongoDB
table.
You can find the source code for this example here
Prerequisites
In order to execute the following example locally, we need to have:
- a valid
Dockerinstallation - a
docker-composeinstallation - an
Amazon S3bucket
Basic setup
The basic setup of the project, begins with the structure:
We create a new project directory:
mkdir my_project && cd my_project
In this project we need to create the folder structure as shown bellow:
my_project/
    \__ Dockerfile
    \__ docker-compose.yaml
    \__ requirements.txt
    \__ dags/
            \__ __init__.py
            \__ my_dag.py
                \__ custom
                    __init__.py
                    transform.py
To generate this structure we run the following command:
touch Dockerfile
touch docker-compose.yaml
touch requirements.txt
mkdir dags/
cd dags
touch __init__.py
touch my_dag.py
mkdir custom
cd custom
touch __init__.py
touch transform.py
Create the Dockerfile
Inside the Dockerfile we paste the following:
# Custom image for Airflow 2.7.2 and Python version 3.11
FROM apache/airflow:2.7.2-python3.11

COPY requirements.txt .

# Upgrade PIP
RUN pip install --upgrade pip

# Install the requirements for local dev
RUN pip install -r requirements.txt
This will create an Apache Airflow v2.7.2 with Python 3.11, next open our docker-compose.yaml
and paste the content from
the example's code.
This will create a full Airflow deployment locally with an associated MongoDB for our example.
Create the requiements.txt
Before starting anything on docker we need to install our requirements.
For that, we open our requirements.txt and insert the following:
# Add the requirement for `airgoodies`
airgoodies==0.0.4
Starting the instance
Now, all we have to do is build and start our airflow deployment:
docker-compose build
docker-compose up -d
After a while, we can navigate to http://localhost:8080, use username: airflow and password: airflow to view the
console.
Setting up the environment
The first step we need to do is to configure the variables used by the DAG, and specifically
used by the airgoodies modules that we are going to user.
We navigate to the Apache Airflow -> Admin -> Variables page, and
select the Choose file option, and insert the following file (airgoodies-variables.json):
{
  "csv_loader.airgoodies-mongo-db-connection-url": "mongodb://root:root@mongo:27017",
  "csv_loader.airgoodies-mongo-db-name": "data",
  "csv_loader.airgoodies-aws-s3-connection-name": "s3_conn",
  "csv_loader.airgoodies-aws-s3-default-bucket": "<s3-bucket-name>",
  "csv_loader.airgoodies-dag-config-file-key": "csv_loader_dag_config.yaml",
  "csv_loader.airgoodies-task-aws-load-from-s3-to-mongo-input-file-variable": "input_file"
}
(Replace the <s3-bucket-name> with the name of your S3 Bucket selected for the example).
And afterwards select the Import Variable option, to insert the Variables into our Airflow instance.
Next step is to create the S3 connection defined in the csv_loader.airgoodies-aws-s3-connection-name variable.
We simply navigate to Apache Airflow -> Admin -> Connections -> New Connection and create connection as such:
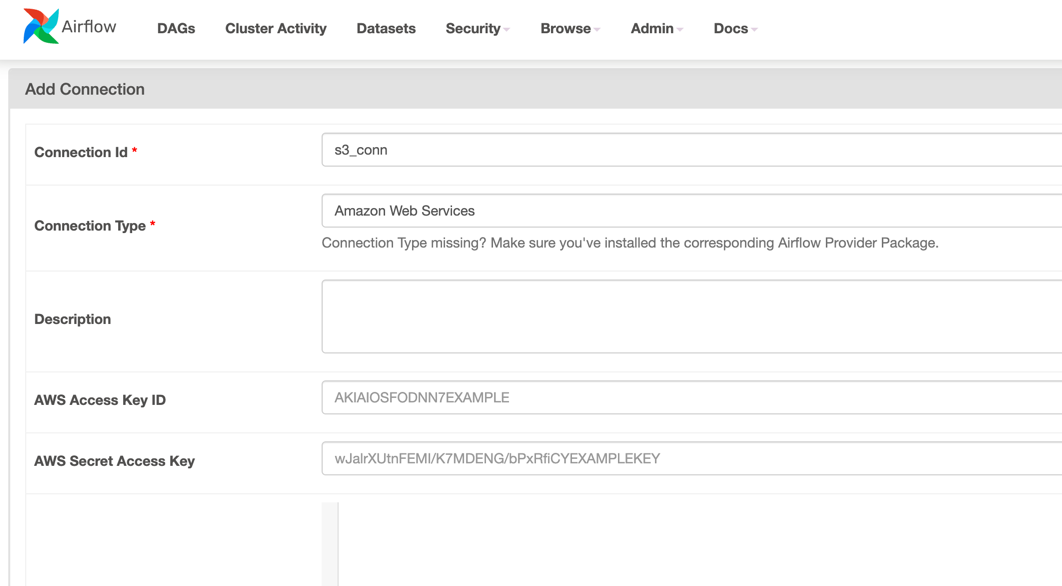
And insert the AWS Access Key ID and AWS Secret Access Key to allow Airflow to access S3 resources, and
select Save
Creating the DAG
In order to create a DAG we copy the following code into dags/csv_loader.py
from airflow import DAG
from airflow.utils.dates import days_ago
from airgoodies.command.parser import CommandParser
from airflow.operators.python import PythonOperator

with DAG(
        dag_id='csv_loader',  # used as prefix for all variables in `airgoodies-variables.json`
        schedule_interval=None,
        start_date=days_ago(2),
        default_args={
            'owner': 'airflow'
        },
        catchup=False,
        tags=['csv_loader', 'aws', 'mongo', 'airgoodies:examples'],
) as dag:
    # Get the logger
    import logging

    logger: logging.getLogger = logging.getLogger('airflow.task')

    # Initialize the command parser
    command_parser: CommandParser = CommandParser(dag=dag)

    tasks: [PythonOperator] = []

    # Parse the commands from the `csv_loader_dag_config.yaml` in S3
    for _task in command_parser.get_commands():
        tasks = tasks >> _task.to_operator(dag=dag)

    tasks
This snippet of code, basically initializes a DAG and uses the fundamental airgoodies utility,
CommandParser which will dynamically create our tasks from the YAML find that we will create in the next step.
Creating the configuration file (csv_loader_dag_config.yaml)
Now, as we said earlier, airgoodies has the ability to dynamically generate our tasks, by using a YAML file,
instead of Python code.
In our case, we want to load a file from S3, parse it and save it to our MongoDB. For this, airgoodies already
provides a pre-defined task
that can handle all the boilerplate functionality,
called load-from-s3-to-mongo-table.
Based on the above documentation, we need to crete a new file, let's name it csv_loader_dag_config.yaml as we
specified in our
task Variable csv_loader.airgoodies-dag-config-file-key, and insert the configuration:
load_from_s3_and_save: # This will appear as our task_id in airflow
  airgoodies_task: load_from_s3_to_mongo_table # The airgoodies pre-defined task name
  config: # The configuration of the task
    custom_transform_method: custom.transform.keep_athens # Use our custom transform method
    output_table_name: my_output_table # The name of the collection to save the result into
Save and upload in our S3 Bucket.
Creating the input data (population.csv)
Next step, is to create the data of the demo, simply create a new file population.csv and insert the following data:
city,population,year
Athens,3153000,2021
Athens,3154000,2022
Patras,215922,2021
Patras,213984,2011
Save, and upload on the S3 bucket as well.
Executing and troubleshooting
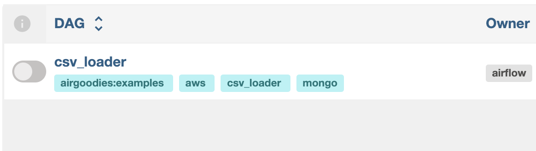
If everything is set up correctly up until now, we should be able to see a new DAG inside our Airflow home page:
On the far right corner we select to Trigger DAG /w config:
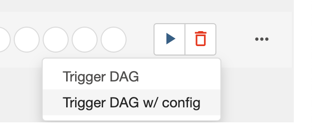
And insert the following configuration and select Trigger:
{
  "input_file": "population.png"
}
After waiting a bit, we will notice that our is failing with the following message:
Traceback (most recent call last):
  File "/home/airflow/.local/lib/python3.11/site-packages/airflow/operators/python.py", line 192, in execute
    return_value = self.execute_callable()
                   ^^^^^^^^^^^^^^^^^^^^^^^
  File "/home/airflow/.local/lib/python3.11/site-packages/airflow/operators/python.py", line 209, in execute_callable
    return self.python_callable(*self.op_args, **self.op_kwargs)
           ^^^^^^^^^^^^^^^^^^^^^^^^^^^^^^^^^^^^^^^^^^^^^^^^^^^^^
  File "/home/airflow/.local/lib/python3.11/site-packages/airgoodies/task/aws_tasks.py", line 65, in load_from_s3_to_mongo_table
    transform_method: Callable[[DataFrame], DataFrame] = getattr(
                                                         ^^^^^^^^
AttributeError: module 'custom.transform' has no attribute 'keep_athens'
The above message is expected because we have defined a method custom.transform.keep_athens as
our custom_transform_method but we have not created it yet.
To remove this message, we need to edit our dags/custom/transform.py and add the following code:
import pandas as pd
import logging


def keep_athens(data: pd.DataFrame) -> pd.DataFrame:
    """
    Function that loads the pandas DataFrame and removes the lines that are not
    related to Athens.
    """
    logger: logging.Logger = logging.Logger('airflow.task')
    logger.info('Running custom transform method: keep_athens')

    # Remove each line not related to 'Athens'
    data.drop(data[data['city'] != 'Athens'].index, inplace=True)

    logger.info(f'New data:\n{data}')
    return data  # Return the DataFrame to write it in MongoDB
Save, wait a bit and re-execute the example. Now everythign should execute correctly:

To verify the resource, we need to log in to our MongoDB (mongodb://root:root@mongo:27017) and verify the saved result
of our table my_output_table in data schema.
The result should look like this:

Conclusion
This example demonstrates just a short example of the abilities of airgoodies, and it was created using
the airgoodies version v0.0.4
Author
Stavros Grigoriou (stav121)